A step-by-step guide to set up a HA Kubernetes cluster with MicroK8s and multipass on Apple Silicon.
I wanted to set up a local high-availability Kubernetes cluster on my MacBook M2 Max running MacOS Sequoia to experiment with different tools, configurations, and architectures for a blog post series on Open Source Data Stacks that I’m working on. Since I had experience using minikube on Linux, I initially tried it on macOS, as it supports Apple Silicon. However, I ran into persistent issues with their drivers that either weren’t compatible with Apple Silicon or had other weird problems.
After wasting an entire evening troubleshooting, I started looking for alternatives. With MicroK8s and multipass, I had a multi-node cluster up and running in just 10 minutes.
Here’s a step-by-step walk-through:
1. Create the microk8s master node 🔗
First, we need to install the required dependencies. We’ll use Homebrew to install MicroK8s and Multipass on MacOS.
# Install with Homebrew
brew install microk8s multipass
Once installed, initialize the MicroK8s master node with the desired resource allocations (CPU, memory, and disk space). Adjust these values based on your system’s capabilities:
# Adjust cpu, mem, and disk space accordingly
microk8s install --cpu 2 --mem 6 --disk 80 --assume-yes
MicroK8s will now set up a lightweight Kubernetes instance inside a Multipass-managed VM. Once the installation is complete, ensure the node is ready before proceeding:
microk8s status --wait-ready
Enable the Kubernetes dashboard add-on (and others if you want to):
# Enable Kubernetes add-ons on the master node
microk8s enable dashboard
microk8s enable dns
microk8s enable registry
At this point, our MicroK8s master node is running and ready to accept additional nodes to join.
2. Generate Join Links 🔗
To add additional nodes to the cluster, we need to generate unique join links on the master node. Log into the MicroK8s VM:
multipass shell microk8s-vm
Inside the VM, ensure the ubuntu user has the correct permissions:
sudo usermod -a -G microk8s ubuntu
newgrp microk8s
Now, you can generate a join link:
microk8s add-node
This will output a command similar to:
microk8s join 192.168.105.13:25000/117662fb388e8bedb008fb19c0861fac/46be32e291d0
Save the commands, as we’ll use them in the next step to add the worker nodes. Repeat this step to generate a join link for a second node - join links are only valid once.
3. Create Worker Nodes with Multipass 🔗
We’ll use Multipass directly to create and configure two additional nodes.
Launch a new VM for the first worker node. Adjust cpu, memory and disk values based on your system’s capabilities:
# Adjust cpu, mem, and disk space accordingly
multipass launch --cpus 2 --memory 6Gb --disk 80Gb -n microk8s-slave1
Connect to the new node and install MicroK8s:
multipass shell microk8s-slave1
sudo snap install microk8s --classic

sudo usermod -a -G microk8s ubuntu
sudo chown -f -R ubuntu ~/.kube
newgrp microk8s
Wait for the node to come online:
microk8s status --wait-ready
Now, use the join command from Step 2 to add this node to the cluster:
microk8s join 192.168.105.13:25000/117662fb388e8bedb008fb19c0861fac/46be32e291d0
After a few moments, the node will successfully join the cluster. Exit the shell.
Repeat the same steps for the second worker node.
4. Verify the Cluster 🔗
Check that all multipass VMs are running with:
multipass ls
You should see all three nodes listed:
Name                State     IPv4             Image
microk8s-slave1     Running   192.168.105.14   Ubuntu 24.04 LTS
microk8s-slave2     Running   192.168.105.15   Ubuntu 24.04 LTS
microk8s-vm         Running   192.168.105.13   Ubuntu 22.04 LTS
Now, confirm that Kubernetes recognizes all nodes:
microk8s kubectl get nodes
The output should looks something like this:
NAME              STATUS   ROLES    AGE     VERSION
microk8s-slave1   Ready    <none>   2m34s   v1.32.1
microk8s-slave2   Ready    <none>   9s      v1.32.1
microk8s-vm       Ready    <none>   28m     v1.28.15
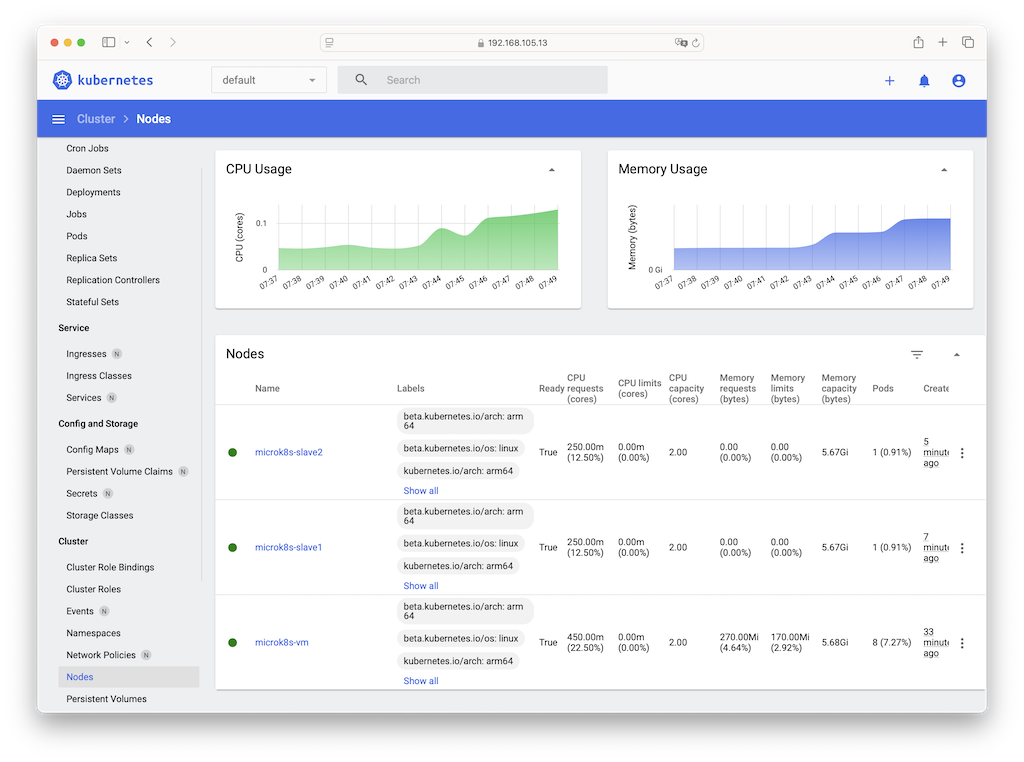
With everything up and running, you can now connect to the dashboard:
microk8s dashboard-proxy

Checking if Dashboard is running.
Infer repository core for addon dashboard
Waiting for Dashboard to come up.
Dashboard will be available at https://192.168.105.13:10443
Under the Cluster -> Nodes section, you will see the newly created master and slave nodes.
5. Kubectl and K9s 🔗
MicroK8s provides a kubectl client via the microk8s kubectl command, but this is somewhat limited. You can install the native kubectl instead:
brew install kubectl k9s
Both kubectl and k9s use the configuration stored in $HOME/.kube/config. We can use the microk8s command on the host (MacOS) to create it:
cd $HOME
mkdir .kube
cd .kube
microk8s config > config
Now you can run
kubectl get pod --all-namespaces
and
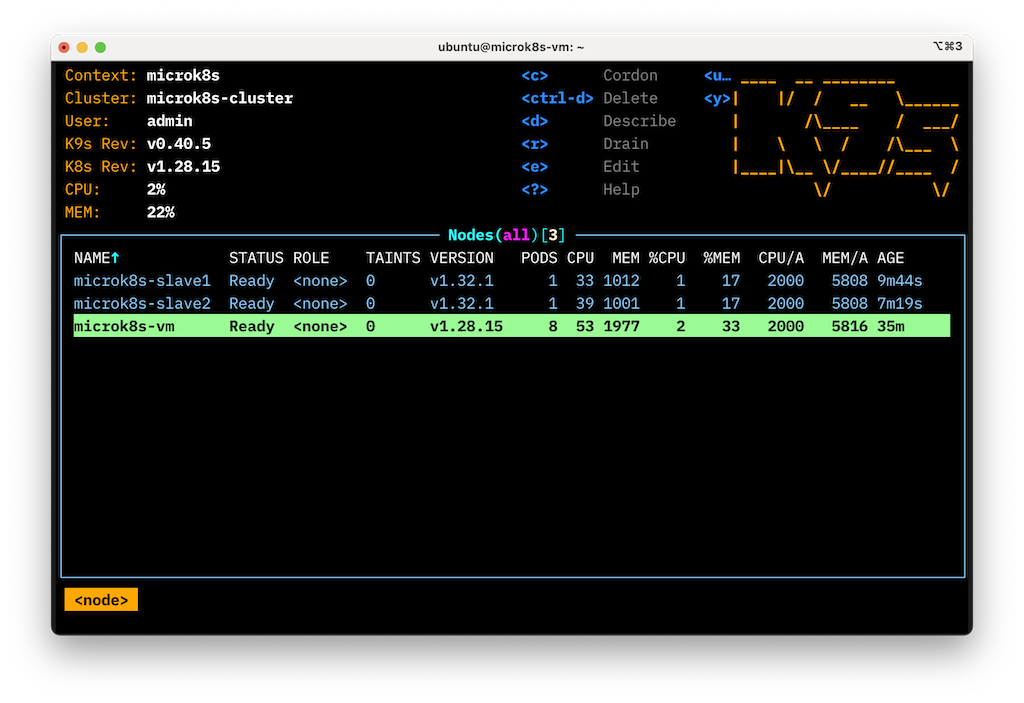
k9s --all-namespaces -c Nodes
6. Starting and stopping the cluster 🔗
Multipass preserves VM states and your Kubernetes VMs should come up again even after you reboot MacOS. You can stop them with the following command:
multipass stop --all
And start them again with:
multipass start --all
You can check the status of your cluster nodes with:
multipass list